Welcome to The Galison theme documentation!
If you have any questions and you can't find answer here, don't hesitate to contact us via contact form or ThemeForest. You can also follow us on Facebook, Twitter or ThemeForest to keep track of theme updates and future themes. Also, feel free to suggest new features and we'll consider it for the next updates.
Please don't forget to rate Galison theme on ThemeForest if you like it.
Theme Installation
First thing's first - extract the zipped package downloaded from ThemeForest to your hard drive, and locate the-galison.zip file. This is installable WordPress theme that you will use.
You can install theme in two different ways:
1.1 Install via WordPress
- Go to Appearance → Themes.
- Click Add New and then Upload Theme.
- Choose extracted the-galison.zip file from your hard drive.
- Click Install Now.
- Finally, click Activate the theme.
1.2 Install via FTP
- Connect to your hosting account via FTP.
- Unzip the-galison.zip.
- Upload extracted the-galison folder to wp-content → themes.
- Login to your dashboard and go to Appearance → Themes to activate it.
1.3 Theme License
Upon theme activation you'll be redirected to Theme License page. This is optional, but recommended step. By activating theme you'll be able to receive automatic updates.
In order to get license key, you need to:
- Register on our webiste.
- Contact us with theme name and your purchase code.
You'll receive email from us within 24h with license key in it.
2. Plugins & Demo Install
Plugins are not required to use base theme functionality. However, in order to make everything working like on demos, you'll need to install them.
All plugins are free, open source and hosted on WordPress.org except The Galison Shortcodes which is bundled with theme.
Note: Some widgets will not be imported like Twitter, Instagram and Mailchimp (newsletter widget) because of API keys. You'll need to create those on your own, as per instructions in each widget.
TB Core
This plugin has no options, so you just need to turn it on in order to use our shortcodes for typography (dropcaps, highlights) and post views. If you want to be able to record post views, you need to activate this plugin. You'll also be able to sort articles by views in widgets and modules.
TB Comments Voting
This plugin enables your visitors to vote on comments (like or dislike comments). To configure it, do this:
- Go to Comments / TB Comments Voting
- Check Status (enable it)
- Under position select Custom Position
- Save
Regenerate Thumbnails Plugin
This plugin allows you to regenerate the thumbnails for your image attachments. If you're starting from scratch (you don't have any content, posts, pages) you don't need this plugin. If you already have some content, you need to install, activate & run this plugin to regenerate images to match theme layout. This way theme will use proper image sizes, and it will also improve website's performance.
Post Ratings Plugin
If you choose to use this plugin, you'll be able to display posts based on ratings (in widgets and page builder modules).
Configuration:- Go to Settings / Post Ratings
- Under Link location check I have my own action hook and save. No need to enter anything in the field that will appear below.
Now you'll be able to choose whether you want ratings to appear in the "byline" part of posts and modules.
3. Image Sizes
Each theme has predefined image sizes according to it's design and layout. Recommended image size is: 1280x774px and it will be enough for all layouts and modules except for Quick Jump Hot News where 1920x260px images are required. There will be no problems if you upload bigger image to your posts, like 2000x2000px - WordPress will automatically cut it to appropriate sizes, and theme will use specific size for each layout / module. Bare in mind that images will be cut / cropped by WordPress, so always try to use recommended image sizes.
4. Page Setup
To create front page or contact page, you'll have to first install Unyson plugin. The best would be to install & activate all recommended plugins in the video above "Plugins & Demo Install". Once Unyson is installed, make sure Page Builder extension is installed.
4.3 Single Page Setup
There are total 5 different single post styles. General settings for single pages are available from Theme Options / Single and you can also override all settings as you like on single page itself (post style, breadcrumbs, extras, comments, layout and much more...).
4.4 Single Page Review
Theme comes with ability to add pros and cons at the end of each post / article. To create pros and cons, just scroll down to Post Settings and you'll see this:
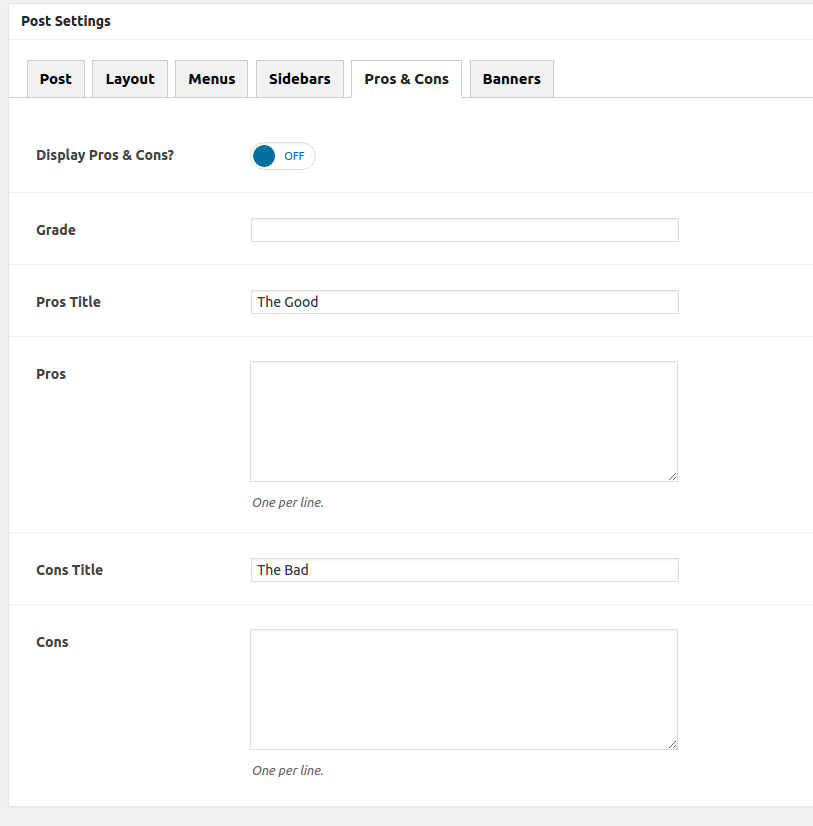
In Grade field you enter your grade from 1 to 100. If you decide to display your posts with pros and cons in Enhanced Posts Widget grades will appear in red, yellow or green background depending on grade itself.
- Red: 0-50 grade
- Yellow: 50-85 grade
- Green: 86-100 grade
You can change this in Theme Options / Single / Review settings.
5. Theme Options
The Galison comes with dozens of options separated into logical sections. Bellow is a list, brief description of each particular section. Almost every option is described in the theme options admin panel itself.
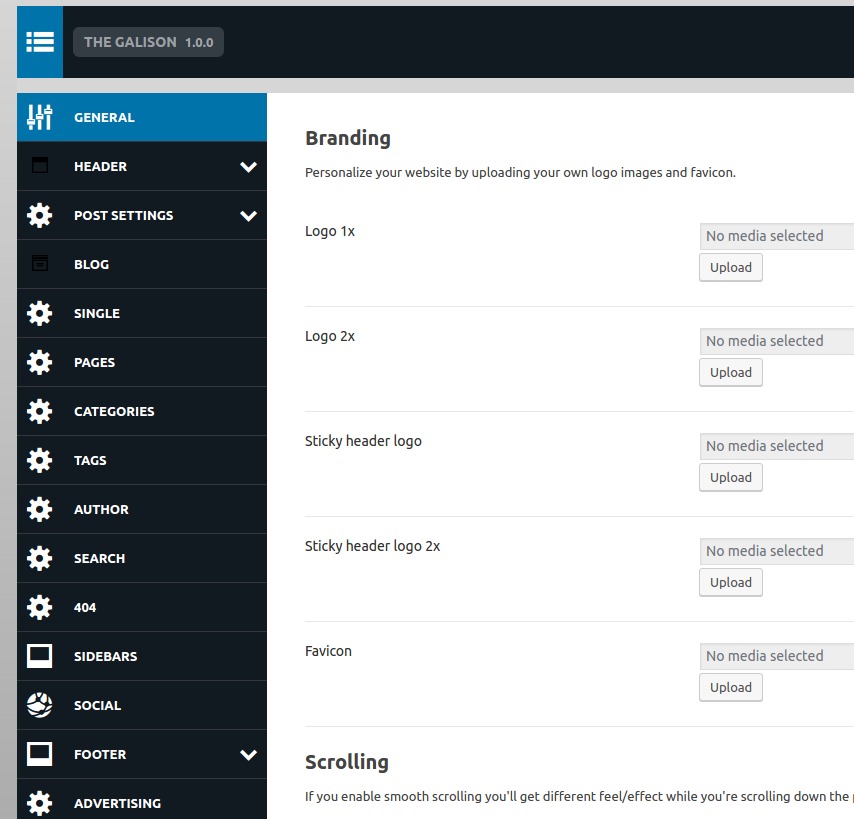
- General This section contains options for branding (logo, images), smooth scrolling...
- Header This section is divided in 5 subsections:
-
Top Bar Options for managing top menu. Top bar can be enabled, disabled, divided in 2 parts (50%-50%, 66%-33%, 75%-25%, 80%-20%, or 33%-66%, 75%-25%, 20%-80%) and you can choose what you will display in each part (menu, forecast, social, search, date or custom text). All colors are fully customizable.
Here's a quick overview on how top bar works in theme, how to add/remove date, search, text, menu and set different order, or turn off top bar completely. Bottom bar and main area also work the same way.
- Main Area Options for managing main area of header. Main area can be divided in 2 parts (50%-50%, 66%-33%, 75%-25%, 80%-20%, or 33%-66%, 75%-25%, 20%-80%) and you can choose what you will display in each part (menu, forecast, social, search, date or custom text). All colors are fully customizable, so as height of main area.
- Bottom Bar Options for managing primary menu. Bottom bar can be enabled, disabled, divided in 2 parts (50%-50%, 66%-33%, 75%-25%, 80%-20%, or 33%-66%, 75%-25%, 20%-80%) and you can choose what you will display in each part (menu, forecast, social, search, date or custom text). All colors are fully customizable.
- Sticky Header Options for the menu that will (optionally) stay on top as user scrolls down the page.
- Forecast Options for weather forecast (uses DarkSky API). Forecast can be displayed in 3 locations: top bar, main area or bottom bar. To make it appear in the top bar, go to Header → Top Bar. Under Top bar columns widths select 2/3 + 1/3. Under Top bar left column select for example menu, and under Top bar right column select forecast. That's it.
-
Top Bar Options for managing top menu. Top bar can be enabled, disabled, divided in 2 parts (50%-50%, 66%-33%, 75%-25%, 80%-20%, or 33%-66%, 75%-25%, 20%-80%) and you can choose what you will display in each part (menu, forecast, social, search, date or custom text). All colors are fully customizable.
- Post Settings Global options for post layouts. There are 15 styles total (5 styles, each in 3 variations). You can configure each style / layout separately (title length, meta data, excerpt length), and then select different post layout for the blog page, and different for the category page, but you have to do that in Theme Options → Blog and Theme Options → Categories under "Post Layout".
- Gallery Settings options for look & feel of WordPress galleries.
- Blog Options that will apply to blog page.
- Single Options that will apply to single page.
- Pages Options that will apply to pages.
- Categories Options that will apply to category page.
- Tags Options that will apply to tag page.
- Author Options that will apply to author page.
- Search Options that will apply to search results page.
- 404 Options that will apply to 404 page.
- Sidebars Options that will apply to sidebars such as sticky sidebars, and custom sidebar generator.
- Footer Options that will apply to the footer sidebar such as footer widget layout, footer text...
- Sticky Footer Displays call to action message and sticks to the footer with clickable link (arrows up). Link opens custom content or posts.
- Quick Jump This is a list of icons in top right corner that links to social profiles, hot news, category list and search.
- Social Options / URL's for your social profiles. These profiles can be displayed in the top bar, main area and bottom bar.
- Advertising Options for predefined ad positions in theme: header, above the footer, above and below single post. Ads can also be placed between the posts. AdSense can also be used.
- Translation Quick translate panel where you can change or translate all text displayed on front end of your website.
- Import / Export Theme options backup, import and export tool.
6. Navigation & Menus
Setting up menus for this theme is the same as for any other theme. It uses default WordPress menu system, but also extends it with mega menus.
To create menu, follow the next steps:
- Go to Appearance → Menus and click create a new menu.
- Under Menu Name type the name you want for the menu e.g. "Top Menu", and click Create Menu.
- On the left side you'll see items that you can add to the menu (Sample Page, Page B, Page A on the screenshot).
Select item on the left (Sample Page on screenshot for example), click on button Add to Menu and item will appear on the right side, like on image below.
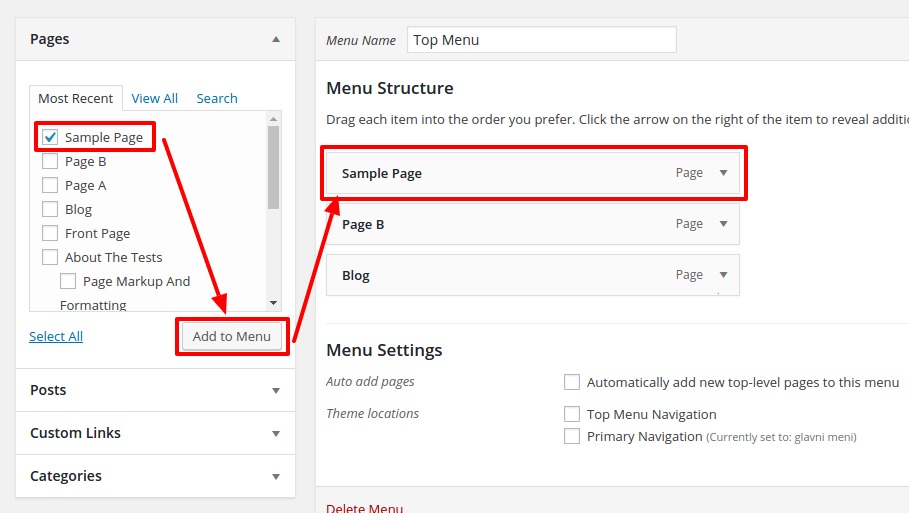
- Click Save Menu to finish.
- Now go to Manage Locations to assign menu to theme location, and select "Top Menu" from the drop down list.
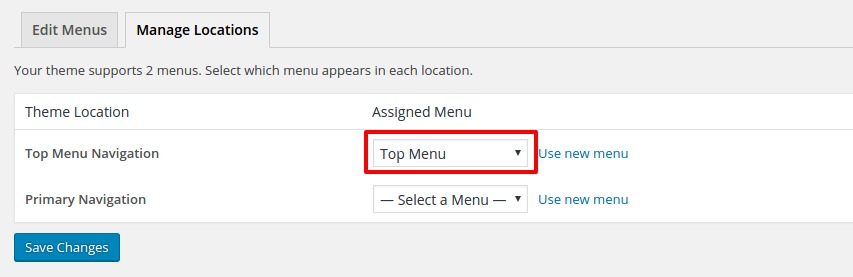
Hit Save Changes once done. Menu should now appear on the front page. Create one more menu "Primary" and add it to "Primary Navigation".
6.1 Mega Menus
Theme also provides mega menu functionality, with which you can achieve different style and functionality.
Note: Mega menus work only in Primary Navigation theme location. Theme supports 2 locations: before the header (Top Menu Navigation), and after header (Primary Navigation).
Theme has different mega menu options for different types of links. There are 2 types of links in WordPress menu system:
- Taxonomy links (categories or products for example)
- Other links (posts, pages, custom links)
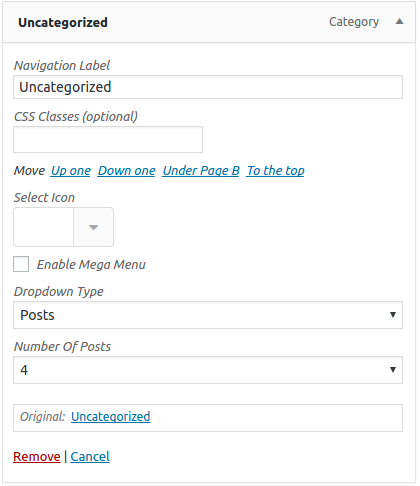
The difference is that categories can display subcategories and posts (or both the same time), while other types of links can display only links. Available options are:
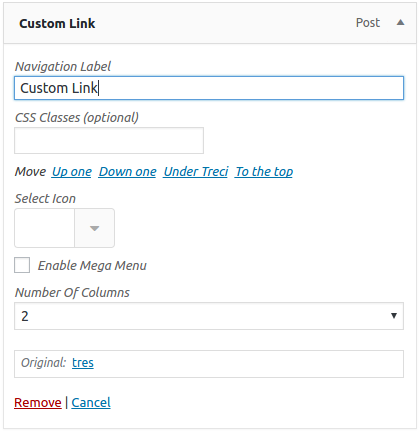
- Select Icon ability to assign icon to link.
- Enable Mega Menu check this to enable mega menu.
- Dropdown Type there's 2 types of taxonomy mega menu:
Posts: displays last 4 posts from category.

Subcategories and posts: displays 4 or 8 posts.
- Number Of Posts the number of items (posts or subcategories) to display.
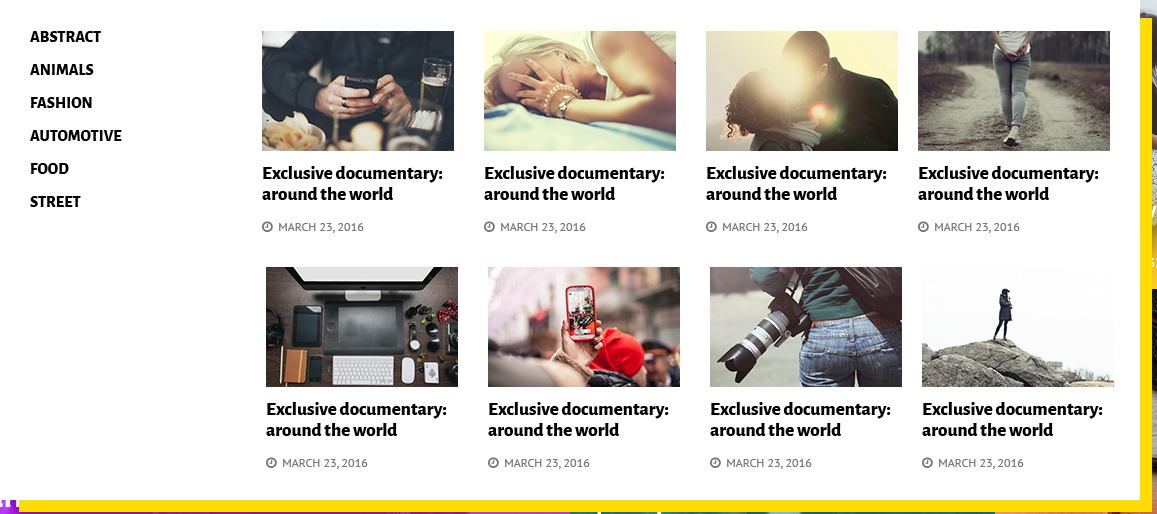
Number Of Columns this option is available in other types (other than taxonomy). Determines in how many columns links should be displayed. Example of 4 columns:

Example with 3 columns:

7. Sidebars
Theme supports sticky sidebars out of the box, but if full width page template is used, extra step is required in order to make it work. We assume if you're using full width template, that you'll use page builder to create whole page. So, you'll probably create 2/3 column (with some modules in it) and 1/3 column (with sidebar module in it). The only thing you need to do is to add a class stick-it (without dot) to the first module in 2/3 column and it sticky sidebar will start working.
8. Child Theme
All modifications should be done via child theme. Child theme is bundled within theme package (if you purchased on ThemeForest), otherwise take a look at this link on how to create child theme.
Note: Parent theme stylesheet (style.css) will be loaded automatically, so there's no need to load it from child theme.
8. Credits
CSS
- Font Awesome - https://fortawesome.github.io/Font-Awesome
- Flat Icon - https://www.flaticon.com/
JavaScript
- Instafeed - https://instafeedjs.com/
- BX Slider - https://bxslider.com/
- FitVids - https://fitvidsjs.com/
- Kwicks - https://devsmash.com/projects/kwicks
- Magnific Popup - https://dimsemenov.com/plugins/magnific-popup/
- jQuery ScrollBar - https://github.com/gromo/jquery.scrollbar/
- Skycons - https://github.com/torryharris/Skycons
- Slick - https://kenwheeler.github.io/slick
- Smooth Scroll - https://www.smoothscroll.net/
- Theia Sticky Sidebar - https://github.com/WeCodePixels/theia-sticky-sidebar
- Tooltipsy - https://tooltipsy.com/
PHP
- Hybrid Core - https://themehybrid.com/hybrid-core
- Unyson - https://unyson.io
- Redux Options Framework - https://reduxframework.com
- TGM Plugin Activation - https://tgmpluginactivation.com
- MailChimp API - https://github.com/drewm/mailchimp-api
Images
- Unsplash - https://unsplash.com
Social Count Plus
Plugin displays number of followers on Facebook, Google+, Instagram, Twitch, Twitter and several other social media websites. To configure this plugin, follow instructions from here.
Once configured, you'll be able to use built in The Galison - Social Count widget based on this plugin or Social Count Plus widget that came with plugin.